You have probably seen those jaw-dropping aerial maps in property listings—the ones that make you stop scrolling and think, “Wow, that place looks amazing.” They are sharp, clear, and show every inch of a property in context.
You know what? You don’t need to hire a map designer to design one by yourself. If you have a drone, and a bit of patience, you can create your own aerial map that can have serious impact to your commercial real estate marketing.
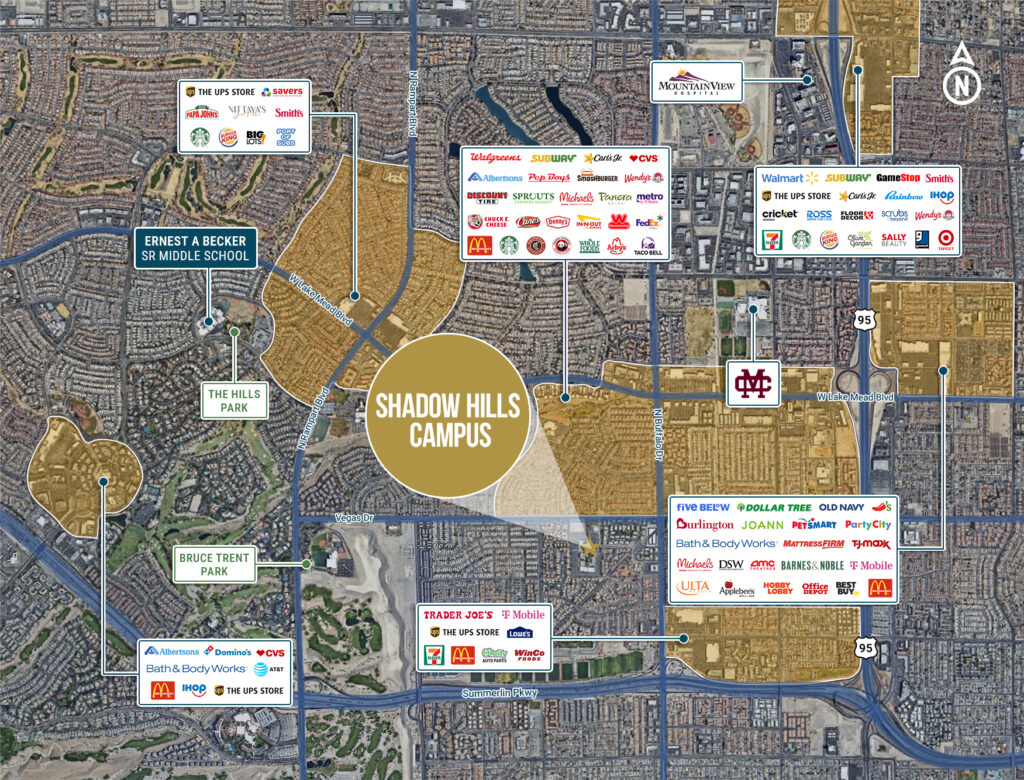
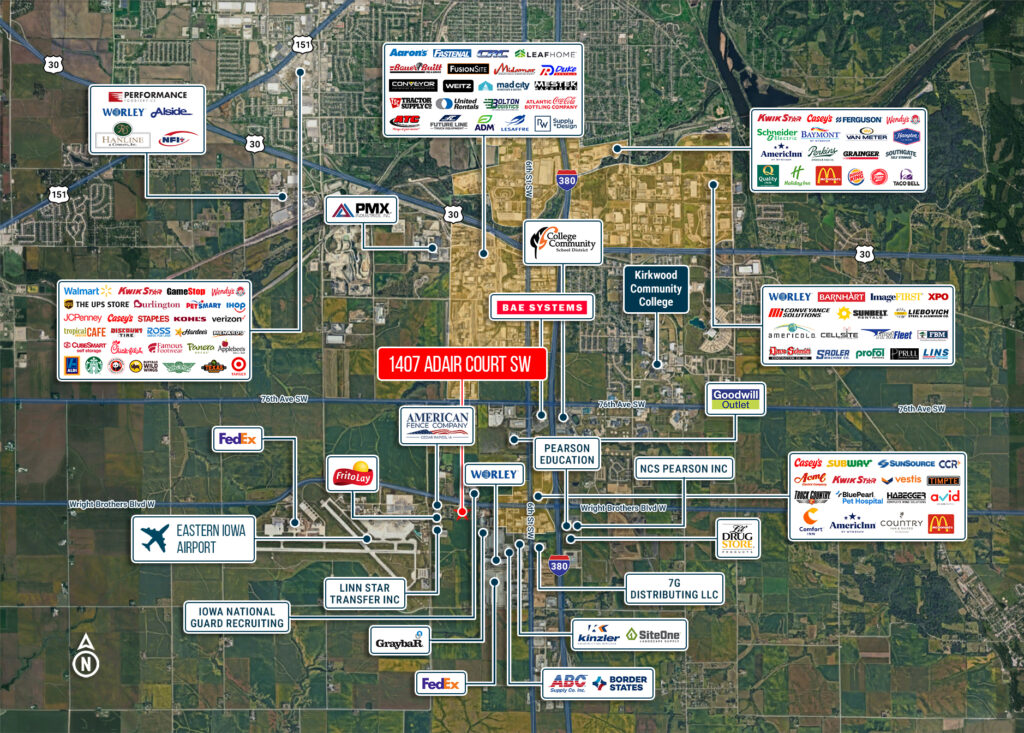
Whether you are listing an apartment building or showcasing land for development, people want to see full potential. The aerial maps do not just tell where the property is, they also show why it is valuable. They present nearby amenities, traffic flow, access points, and neighboring businesses. In short, they answer the big questions before a buyer even thinks to ask them.
If you’re ready to upgrade your property listings, here’s a simple step-by-step on how to create your own aerial map using drone images.
Why Aerial Maps Make a Difference in Property Listings
Let’s start with why they matter.Aerial maps aren’t just for show—they’re valuable marketing tools that:
Give potential buyers a clear overview of the property and surrounding area
Highlight proximity to roads, shopping centers, schools, and other points of interest
Outline property boundaries and lot sizes
Help investors make confident, informed decisions
In the world of commercial real estate, great visuals can be the difference between someone scrolling past or reaching out for more information.
What You’ll Need to Get Started
First off, you’ll need a drone with a quality camera. You don’t have to go top-shelf, but aim for at least 12 MP resolution and solid GPS stability. Some popular drones include:
DJI Mini 3 Pro
DJI Air 2S
Autel EVO Lite+
Next, you’ll need photo stitching software to merge your drone shots into one seamless aerial map. A few good options are:
Pix4Dmapper (ideal for professionals)
DroneDeploy (user-friendly with excellent features)
WebODM (a free, open-source tool for the tech-savvy)
And of course, bring a little patience—this process isn’t difficult, but it does take some time and attention to detail.
Step 1: Plan Your Flight
Before you launch your drone, take time to walk the property. Get familiar with boundaries, potential obstacles, and the angles you want to capture.
Double-check local drone laws (the FAA has strict rules)
Plot your flight path in advance, setting waypoints if needed
Make sure your drone’s camera is set to capture images with at least 80% front and side overlap (this makes stitching the images together later much easier)
Try flying in the early morning or late afternoon for the best lighting. The softer light helps capture better detail and makes shadows less harsh.
Step 2: Capture the Images
Now comes the fun part—flying your drone and taking the shots. Stick to a methodical pattern.
Fly in parallel lines (think mowing a lawn)
Maintain a consistent altitude (higher flights cover more ground, but lower ones give sharper detail)
Capture images in RAW or high-resolution JPEG formats for the clearest results
The more precise and steady you are during this step, the better your final map will look.
Step 3: Stitch the Photos Together
Once you have all your images, it’s time to stitch them into one cohesive map. Upload them to your chosen software:
Import the photos
Define any control points if necessary
Let the software align and merge the images into a complete map
Export your map in a high-resolution format like JPEG, PNG, or PDF
Depending on the size of your property and the number of photos, this process can take a little while. Grab a coffee and let the software do its thing.
Step 4: Add Labels and Highlights
A plain aerial map is helpful, but adding labels makes it even better. Use a design tool like Adobe Illustrator, Canva, or even PowerPoint to add:
Property boundary lines
Labels for roads, neighboring businesses, and landmarks
Zoning information or future development notes
Keep things simple and clean. You want your labels to clarify the map, not clutter it.
Step 5: Use Your Aerial Map in Your Marketing
Now that you’ve got your custom aerial map, it’s time to put it to work. Include it in:
Offering Memorandums (OMs)
Pitch decks
Property flyers
Online listings and email campaigns
A well-designed aerial map that showcases property nearby pictures and potentials helps your property listing stand out and gives potential buyers a better understanding of the property’s location and potential.
Conclusions:
Making your own aerial map from drone images is not as complicated as it sounds. With right planning and the right tools, you can create a high-quality visual that improves your property marketing. In today’s competitive commercial real estate market, small details make a big difference—and a good aerial map could be the thing that sets your listing apart.
If you’d rather have someone handle it for you, we’re here to help. At OMDesign Agency, we create custom aerial maps and commercial real estate marketing materials that help you attract the right buyers and close deals faster.